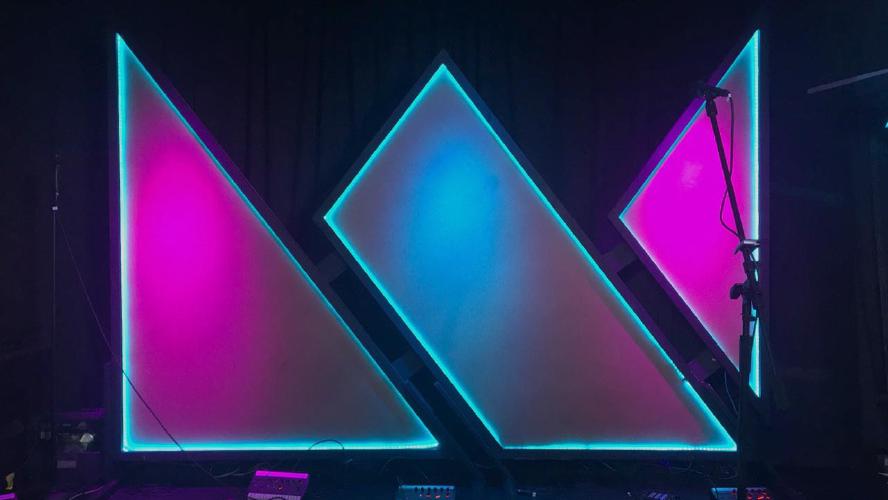
Stage Design Series: Led Crown
Overview
This post is a breakdown of the process I went through designing and developing the large crown you see above this text. It was used for the sermon series: Uninvited King at my home church New City Church.
This was my first big venture into stage prop designing. It tested my rather limited knowledge of carpentry and even further limited knowledge of electronics yet it was still simple enough to not overwhelm me. In order to tackle such a project, I modified and adapted Mark Rober’s engineering design process.
He has an excellent video of his process I highly recommend.
In short, my design process has four main steps:
- researching
- designing
- prototyping
- the final build
I will be the first to admit I am not a perfect follower of this process, as I found myself constantly jumping back to previous steps. (but hey, I’m always learning)
Research

As much as I wish I could, I cannot take credit for the idea of the crown. We stumbled across this idea while brainstorming how we should decorate the stage. As great as it was to have a DIY resource for the project, the article was far from thorough and more research was required in understanding the final project.
Now that the idea was in place, I began to research the individual components we would need.
Framing and Backboard
For the frame I was initially going to use furring strips as that was what the DIY article suggested. However, it was cheaper to buy 8 foot 2x4s and cut them down the middle instead. Also, during this stage I decided I would need to coat the frame with black latex paint. This would force the frame into the backdrop making the LEDs appear even brighter.
It become obvious the frame itself was not enough so, later on, I added a backing board. This way the LEDs reflected back towards the audience and additional lighting could be shone onto the crown.
LEDs and DMX
Prior to this project I had zero knowledge about lighting or DMX encoding. I will not go into detail about DMX encoding in this article as it’s been covered in great detail elsewhere. Here are some valuable resources that helped me understand:
- How to Control LED Tape With DMX
- DMX512 Wiki Page
- How to program DMX lights for beginners (simple lesson)
The LEDs used in the project were high-density LEDs. The choice to go with high-density over regular made the outline vibrantly pop. However, this decision proved deadly for the original power supply.
Power Supply
Initially, I was using a wall plug power supply you might find charging an airsoft gun. It would light up a third of the LEDs before croaking and busting a fuse. I needed something more. In steps the QUANS Watt Universal Regulated Switching Power Supply. This thing is a beast and if I knew much more about electronics I could probably tell you why. All I needed to know was that it powered the LEDs.
Final Material List
- One 6-Foot Extension Cord
- One Power Supply
- One DMX Decorder LED Controller
- Three LED Light Strips
- Two 1/8” 4’x8’ Tempered Hardboard
- Five Prime KD Whitewood Studs
With the research complete, it was time to…
Design
Drafting and Modeling
Even though I had a thorough plan to work off of it was a challenge to resize and fit the prop to the dimensions of the stage. I knew the entire crown had to fit within 10’x6’ area. So, to iron out the sizing, I first opened the image of Church Stage Design Ideas’s finished LED crown and digitally resized it to fit within a 10x6 area. Using this image as a template, I modeled and measured the entire crown within Sketchup.
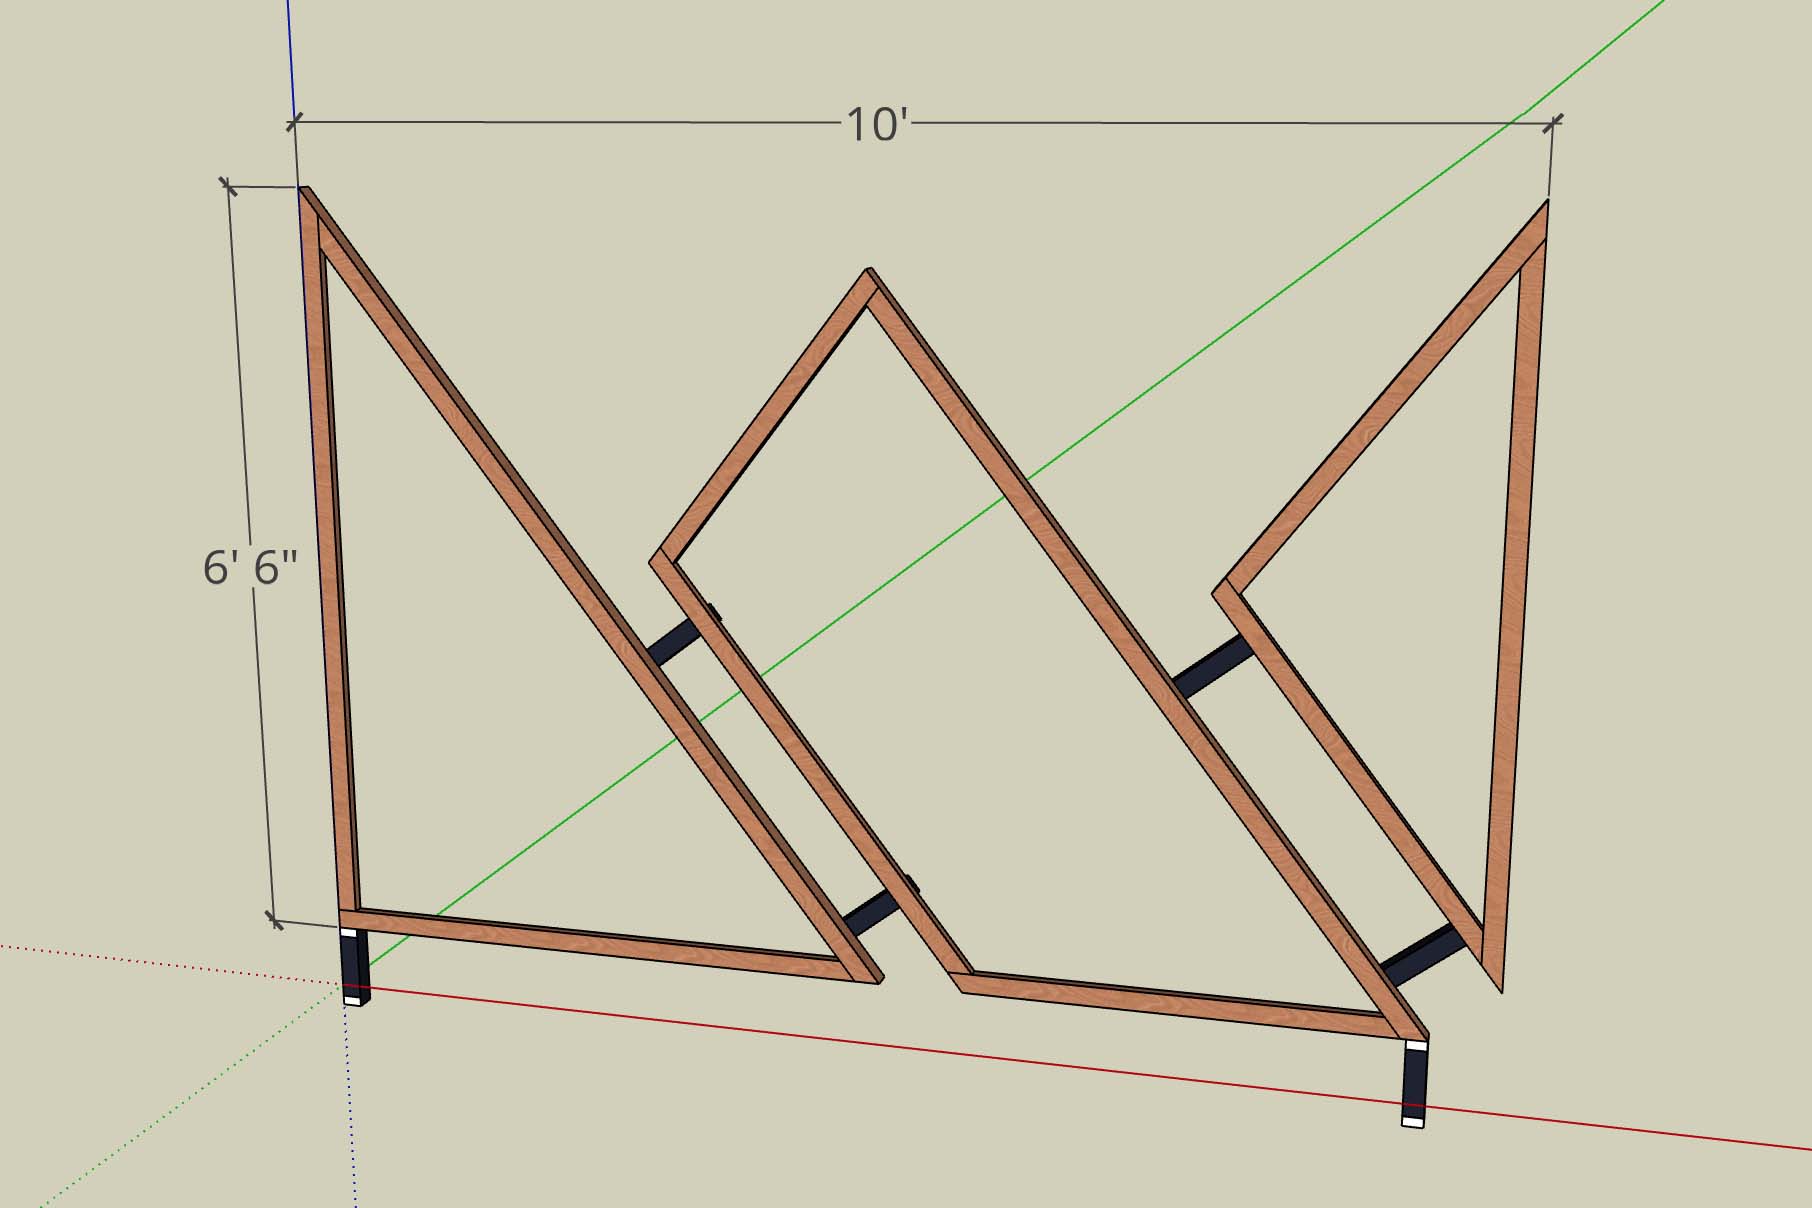
Not only did this make translating the final build from paper to reality that much easier, it also allowed me to build a smaller scale version of crown I used for…
Prototyping
The team I was working with also wanted a smaller version of the crown logo for use in the church’s lobby. Despite it greatly deviating from the final build (no LEDs and a solid inside), this was still the perfect time to verify that I had the dimensions and shape correct. With the prototype completed it was time to move on to the…
Final Build
Construction
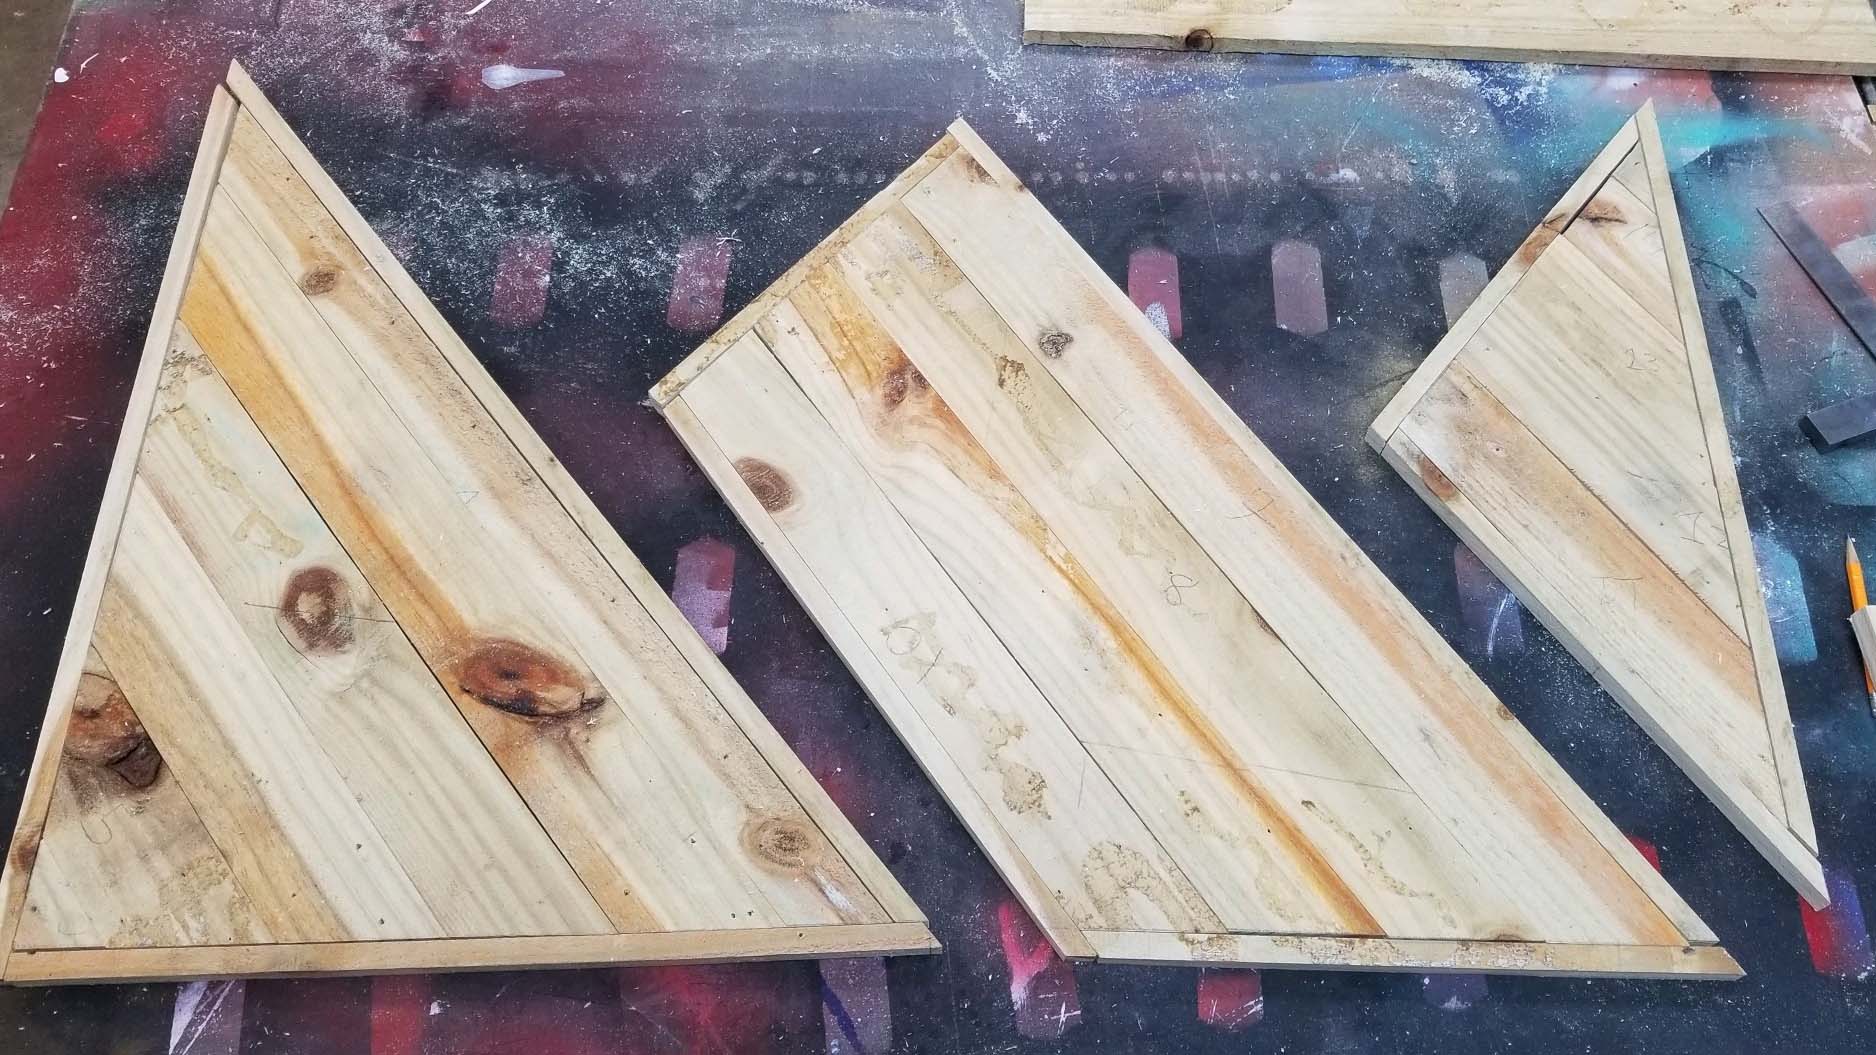
The first steps was to split each of the 2 by 4 boards down the middle to have several 2-inch perimeter planks and cut them down to the correct length. Once this was done, an angled joint was cut into each end of the board and a groove was routed on the inside for the LEDs.

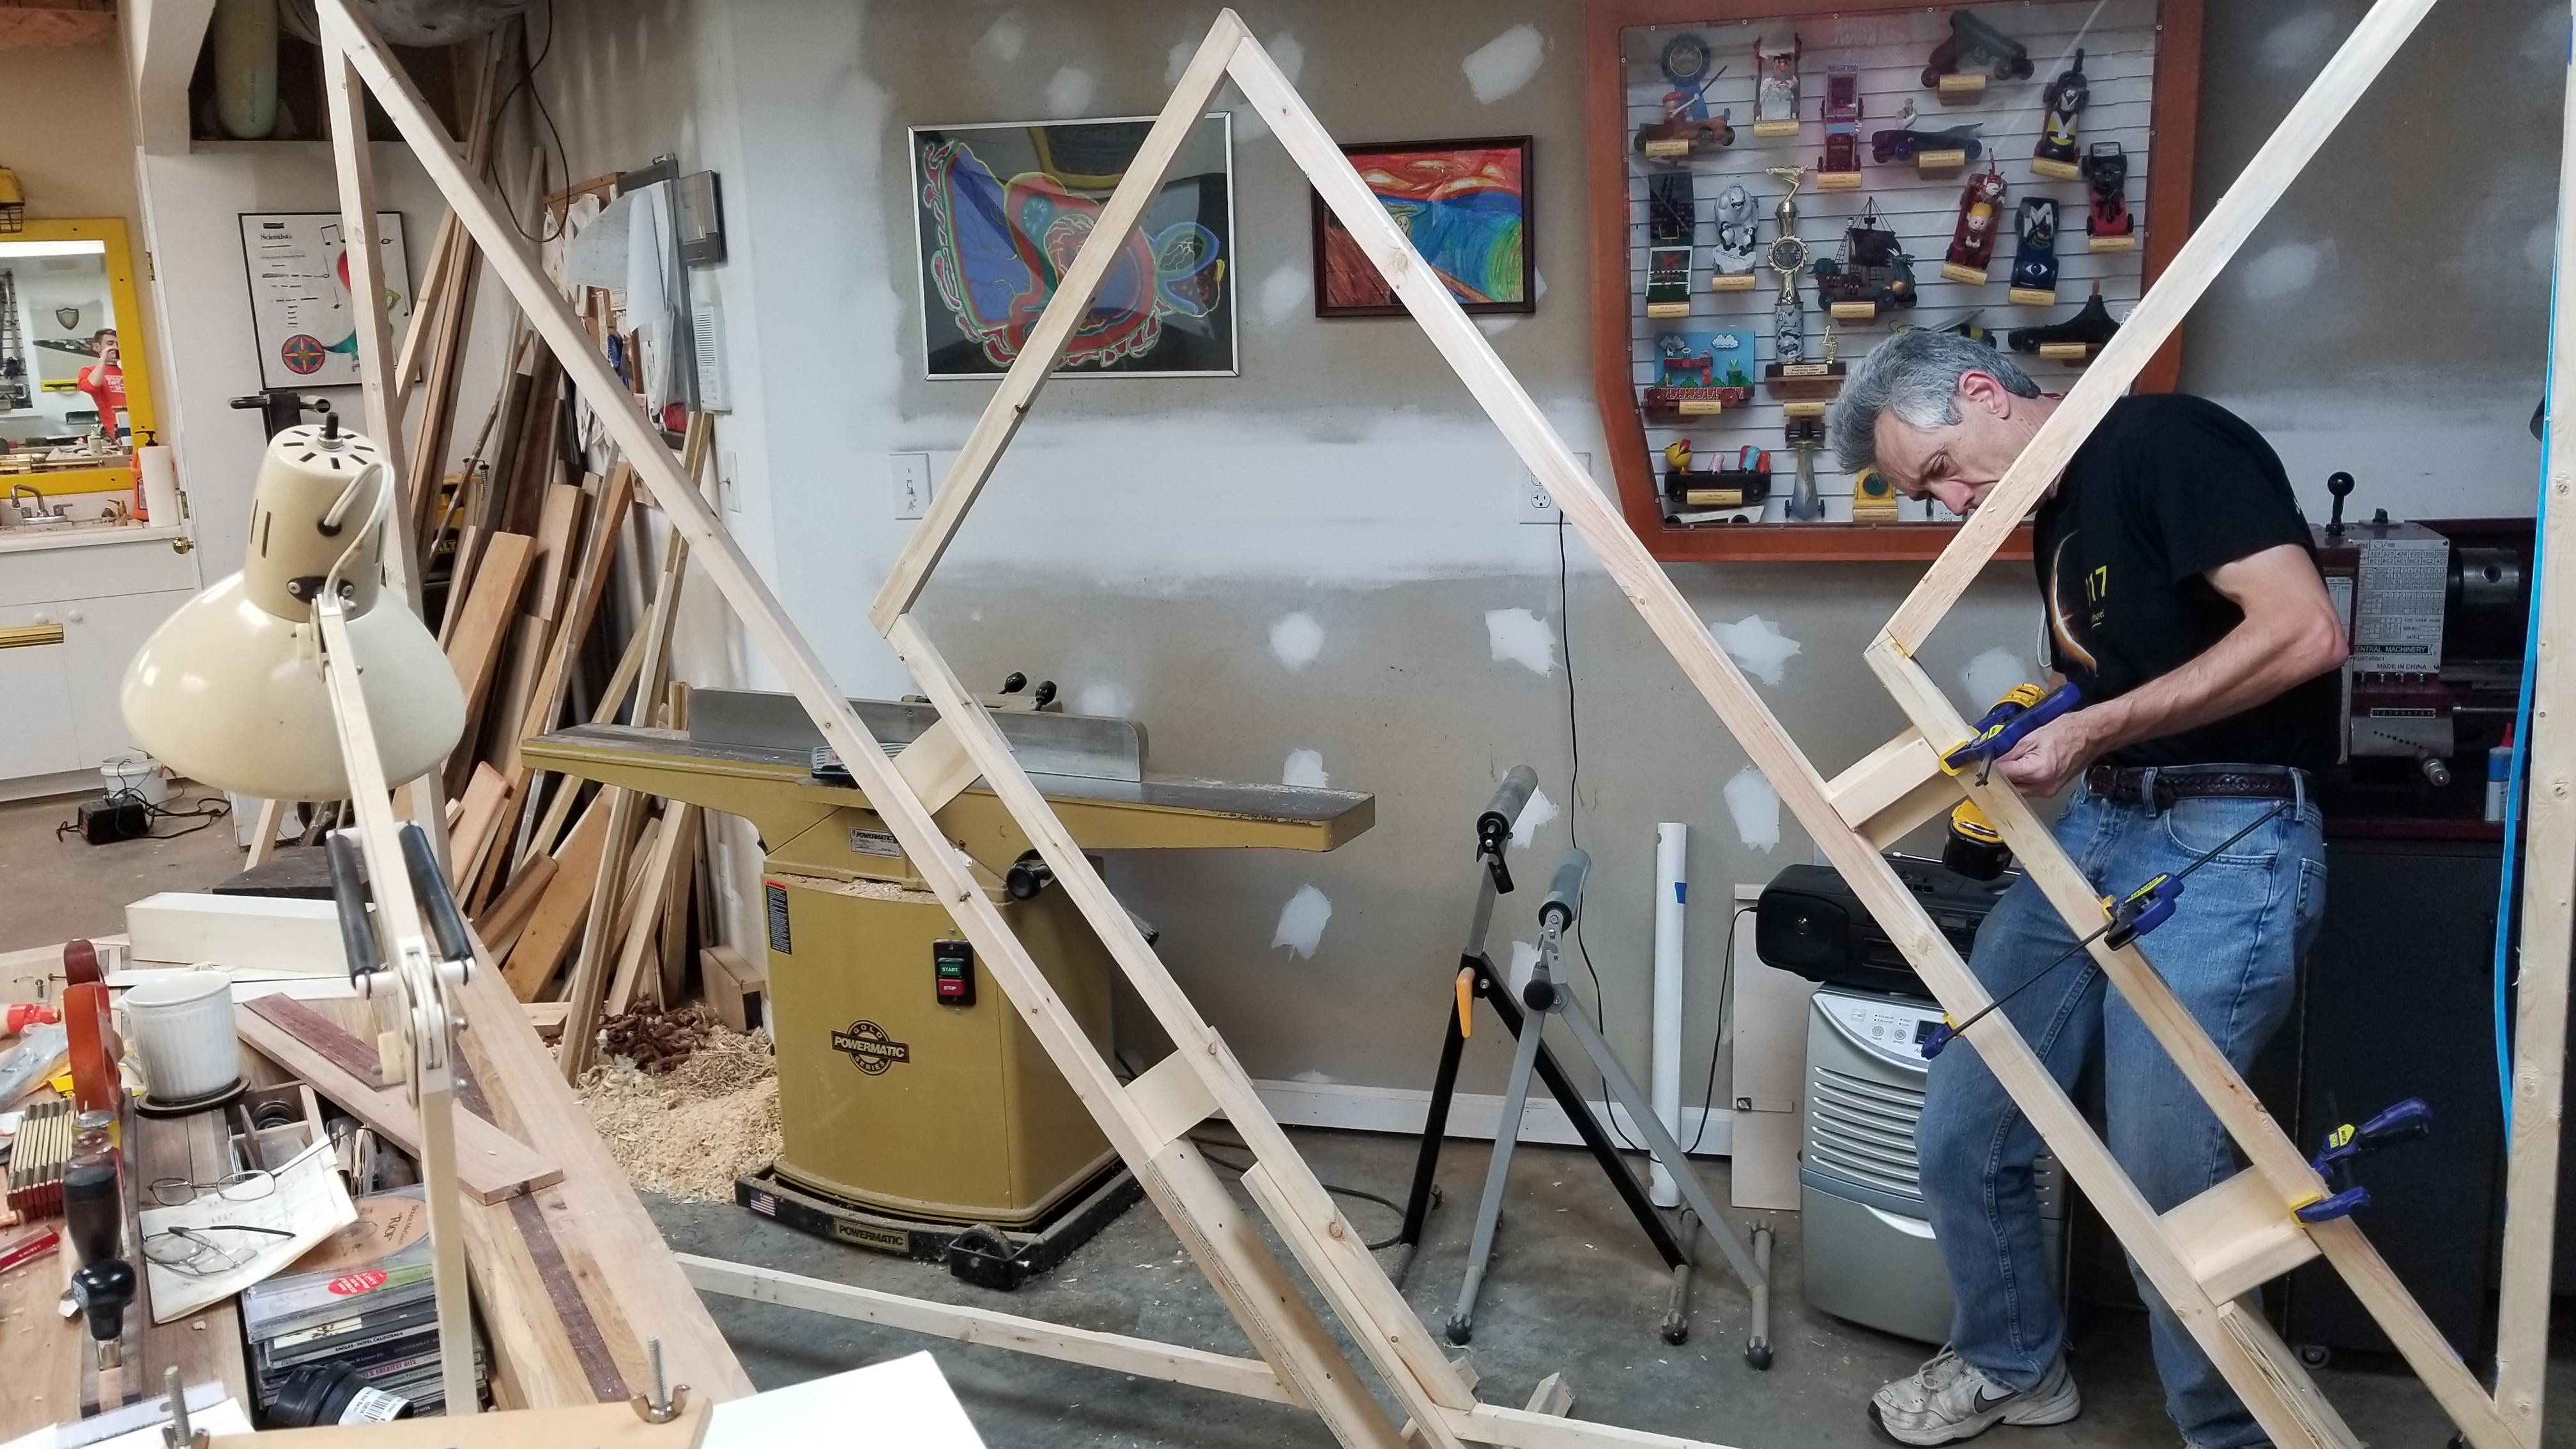
With each piece measured and cut, the pieces were fit and glued into place and side braces were added to connect each section of the crown together. (picture feat. my amazing dad)
Before attaching them to the completed frame, I used a small piece of scrap wood to test the LEDs. During this stage, I wired everything up to the DMX encoder and ran it through its automatic presets to see how the LEDs shone.
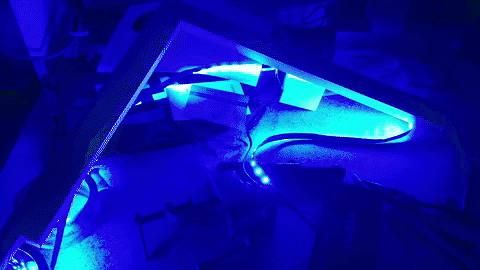
With the frame complete, the LEDs were unwrapped and adhered to the inner groove, small holes were drilled at the bottom for the wiring, and the LEDs were fully tested.
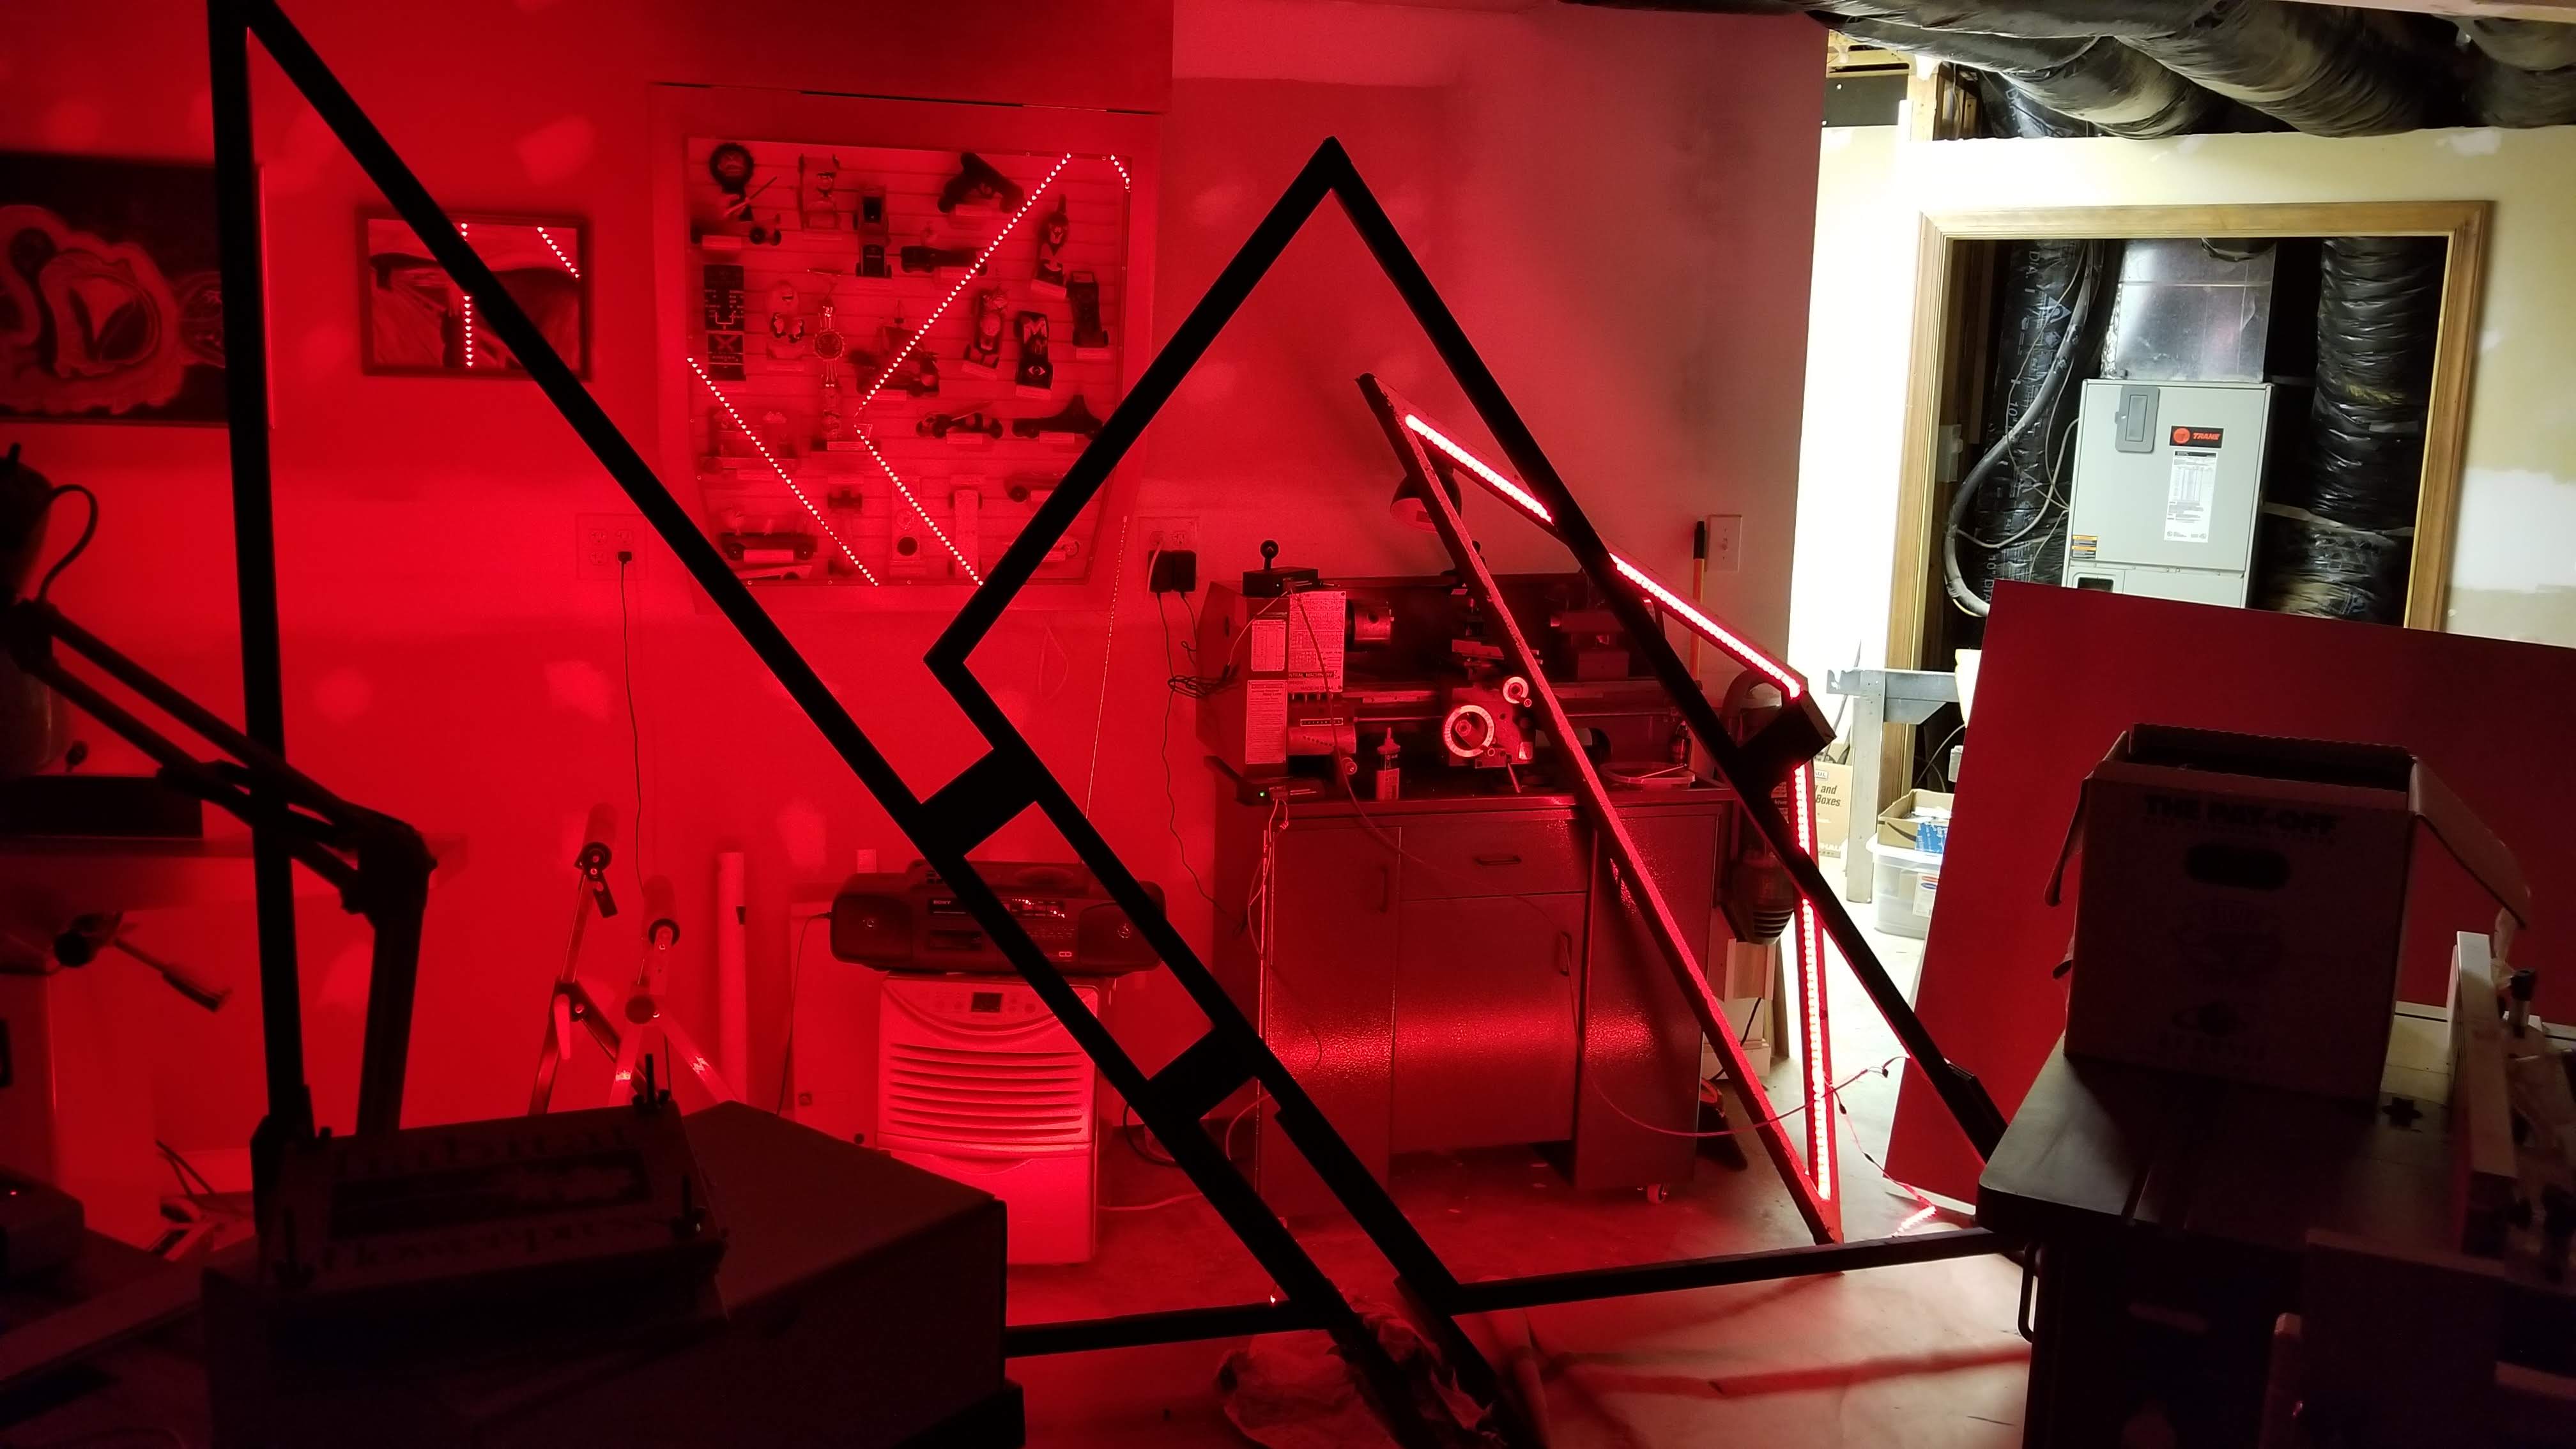
At this stage it became apparent that the simple framing was not enough to reflect the LEDs and there was no backlighting. Thankfully attaching a piece of tempered hardboard across the back proved all that was needed to provide the desired pop of light.
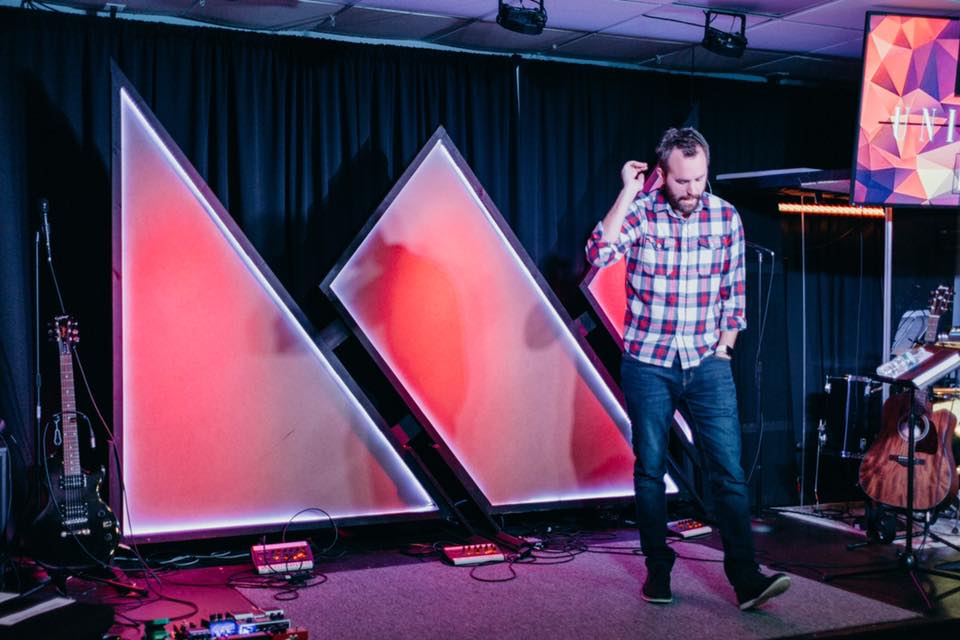
With that, the crown was completed and all that was left was to rig it to the stage.
On Display


Aftermath
Lessons learned
All in all the project took about 2 months from research to completion and the biggest lesson I learned was the importance of time management. This is something everyone struggles with and I am no exception. Towards the end of the project I was rushed to attach the LEDs and this led to a poor wiring job and more problems down the road.
Disaster after disaster :(
The LEDs themselves only lasted a few weeks. Between poor connections and overheating, the wires quickly got destroyed. If I were to do this part over, I would use the plastic wire connectors made specifically for LED strips. With the LEDs out of commission, the crown was just displayed with overhead lights on it. While this did not look terrible, between no LEDs and LEDs the difference was night and day.
Unfortunately, while the design was being stored it suffered water damage and is no more. Tragedy aside, the knowledge I gained from the project was worth it alone and even though the crown is now resting in a dump somewhere in the end it was all worth it.